


Contents |
||
| Previous Tutorial | Back to Index | Next Tutorial |
|---|
|
|
|
|
||||||||
|
|
|
|||||||||
Photos of signs and buildings (or other orthogonal objects) are often affected negatively by lens distortion and perspective and from additional
distortion arising from the fact that the picture was not taken directly "square" or even level with the object being photographed.
The software PTLens was designed by Thomas Niemann to deal with this and in a brief
review we discuss what this program actually achieves and what it appears to lack. Further, the use of ImageMagick® as accessed through PHP
is considered for purpose of reestablishing orthogonality ("right-angledness") in the program Correctrix.
Schematic diagrams in this tutorial were produced with InterDraw, the program described in the previous tutorial.
The photos in this tutorial—including the above—were produced by Correctrix.
The topic of installing Imagemagick® and the Imagick DLL for PHP on your computer has been dealt with in the tutorial on ImageMagick® and Panorama Processing.

PTLens was primarily designed to remove or minimise lens distortion. This can come in two forms: pincushion, where the sides of the image
are squashed towards the image centre, or barrel, where the sides are extended beyond the image boundaries. To remedy this the opposite distortion
is applied by means of the Dersch equation:
AR4 + BR3 + CR2 + DR = R'
As other commentators have pointed out, the terms A and C are optically meaningless; and D only has meaning insofar as it rescales the distorted
image so that it is normally used to reset the corners or midlines to their original values.
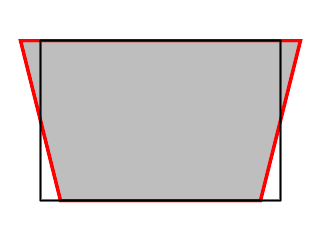
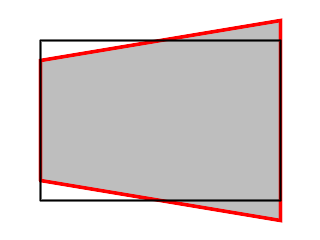
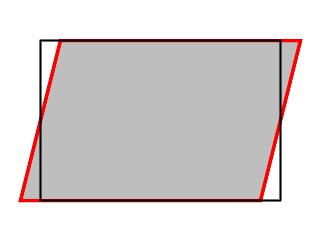
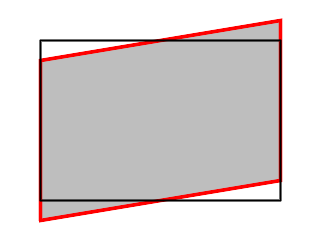
The first image above right shows the effect of a pincushion transformation (black -> red, which is the sequence for all the following diagrams) to offset the effect of barrel lens distortion and the second how pincushion lens distortion is offset by a barrel transformation (in both cases with ideal values for D which reset the image corners or midlines).
Niemann supplies PTLens for $25 packaged with the Dersch coefficients for a large number of cameras that he has tested. You can download a trial version which can be upgraded following payment. The trial version can be used for 10 images and will supply the necessary Dersch coefficients if data for your camera is available.

It should also be pointed out that complex distortion (part-barrel, part-pincushion) cannot be compensated for by the Dersch equation because it lacks a fifth power term. Unfortunately the image distortion procedure in Imagick is based squarely on the Dersch equation, so that not only are the coefficient arrays half-full with redundant terms, this type of distortion cannot be compensated for by Imagick either.
After dealing with lens distortion (and, if you're lucky, with the Dersch coefficients supplied for your camera), PTLens offers a number of manipulations designed to straighten out your image. Not all are listed or exemplified, but here are some of the more useful:
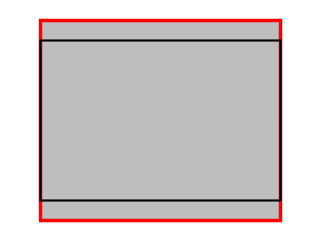
Rotation (left): the image can be rotated in 0.1� steps. Since nearly all images taken freehand are inadvertently rotated (and even setting up a tripod with a spirit level is no guarantee that a picture will be absolutely level) this can be a useful option.
Horizontal (first image on the right) and vertical tilting reduce the perspective distortion from not being directly square with
the object being photographed. Horizontal distortion occurs when the left hand side of the object is closer than the right hand side (or vise
versa) and can be corrected by horizontal tilt; and vertical distortion results from the bottom of the object is closer or further away than the top
of the object and is corrected by vertical tilt. Both tilts can be positive or negative and can be adjusted independently of one another.
Niemann's tilts do not work exactly as demonstrated here, for one thing he has the receding side move closer to the image center. This is just
another inadequacy of his mathematical model.
X- and Y-shifting can be used to reposition the image. Often an image will lose corners due to the combined effects of distortion correction and horizontal and vertical tilting. X and Y shifting can then be applied to position the image to reduce cropping losses that will occur when the picture is finally squared.


Scaling is probably the last step in the sequence to straighten out the image, although it is practically irrelevant. Downscaling is allowed, although it will result in a picture with large undefined (black areas); upscaling results in the removal of the undefined areas, but also concomitantly removal of border areas of the original image. Note also that scaling is locked, i.e. scaling in the X dimension results in corresponding scaling in the Y dimension. Although scaling results in an image of identical dimensions to the original image, the processed image should be resampled to a lower resolution (= smaller size) and sharpened as a final step to improve overall image clarity, but this would have to be done with another imaging processing program, such as IrfanView.


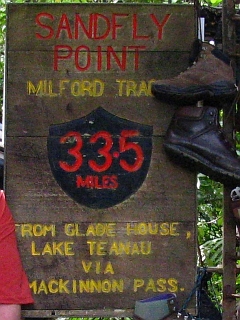
Depending on the angle of the shot, PTLens will only go so far in reestablishing orthogonality. In this picture of a sign (original left) it is clear that the vantage point was above the sign, closer to the left than the right and that the sign was not directly facing the photographer, but that the shot was taken from the lefthand side. PTLens will straighten out the sides and make them parallel, but it won't make the angles at the corners of the sign into right angles. Rotating the image has no effect on the relative angles, and no amount of horizontal or vertical tilt will remedy the problem (PTLens corrected image right).
What is needed here is to shear the image, an operation in which the area of the image is retained whilst two parallel sides are shifted
relative to one another.
When I asked Niemann if he would consider adding a shear tool, he simply replied, "Photoshop", so I left it at that.

Another aspect that bothered me was that, even after shearing the sign, the angle the photo was taken at has reduced the width, so that the
writing appears to be squashed. This could easily be remedied by having the X and Y scaling independent of one another. Of course there are times
when X and Y should be scaled together, but it would be rather simple to have a checkbox to determine whether the scaling was to be locked
or not.
Or use the ubiquitous Photoshop.
If PTLens has the data for your camera, it is worth a consideration. The Dersch coefficients change with the lens zoom factor so that
automatically adjusting for this can save some fiddling about.
Another aspect which I haven't gone into any detail here is that PTLens will also correct chromatic aberration. I found the results quite minor,
though, and as many of my images are seriously scaled down before publication, I would question whether this was absolutely necessary.
As for the operations themselves, they can be quite finicky. A grid can be superimposed on the image to help with orientation, but very often it's
n steps of horizontal tilt, m steps of vertical tilt, adjust the rotation, take back some horizontal tilt, adjust the vertical tilt,
reduce the rotation, seemingly without end.
At that point I thought to myself why not do the while thing—including the shear and independent scaling, and perhaps a couple of other
things as well—with the Imagick extension for PHP. Instead of Photoshop.
Turned out to be much simpler than I could possibly have imagined.
We'll use a form to first of all load an image; once the image is loaded the form will be used to input the data (rotation, Dersch's B, horizontal tilt and shear, vertical tilt and shear, X and Y stretch factors) required to either preview the transformed image, or save it to a destination file.
As often the case we will begin with a form for data collection. First we will want to choose a file (from the same directory as our PHP file operates from, but see also the Exercises section of the Panorama Slicer tutorial for hints on how to access any file in any subdirectory).
<?php
extract ($_POST);
$b = "\r\n";
echo "<html>$b";
echo "<head>$b";
echo "<title>Lee Traynor's Correctrix</title>$b";
echo "<link rel=\"stylesheet\" type=\"text/css\" href=\"formats.css\">$b";
echo "</head>$b";
echo "<body class=\"white\">$b";
echo "<center><h2>Lee Traynor's Correctrix</h2>$b";
echo "<form method=\"post\" action=\"{$_SERVER["PHP_SELF"]}\">$b";
echo "<table>$b";
if (isset ($grfile) and $grfile)
{
# this is where our image manipulation will occur.
}
echo "<tr>$b<th align=\"right\">Load Picture: </th>$b";
echo "<td><input type=\"file\" name=\"grfile\" size=\"40\"></td>$b";
echo "<td><input type=\"submit\" name=\"submit\" value=\"Preview\"></td>$b</tr>$b";
?>
</table>
</form>
</body>
</html>
This gives us the opportunity to load a file (grfile, which will be extracted to $grfile by extract ($_POST) when calling the same script).
Before we start manipulating the image, it does well to consider whether we want to be trying out the manipulation on the image as a whole,
which can be a time consuming procedure, or whether it would suffice to work with a "thumbnail" with enough resolution to ensure
good quality images. If so, then the first step would be to produce the thumbnail. Next, we would perform the manipulations on it and show the
result. Now, if we performed these manipulations on an image that was the same size as the image we then viewed, the latter would become
blurred in the process and it might be difficult to determine whether the manipulations had had the desired effect or not. The trick is to
produce a thumbnail at twice the resolution of the image viewed and resample it to the viewing size with sharpening. In this way, some of the
crispness of the original is retained.
We need to:
# if $grfile is set:
if (!isset ($scale))
{
$im = new Imagick ($grfile);
$width = $im->getImageWidth ();
$height = $im->getImageHeight ();
$aspect_ratio = $width / $height;
if ($aspect_ratio > 1) $sw = 1280;
else $sw = round (1280 * $aspect_ratio);
$sh = round ($sw / $aspect_ratio);
$scale = $width / $sw;
$im->resizeImage ($sw, $sh, Imagick::FILTER_SINC, 0.7);
$im->writeImage ("Source.tif");
$im->destroy ();
}
# [In any case, there is now a file source.tif with the current image that can be resampled to half size and displayed.]
# [Intermediate image will be transformed at this point.]
# [Grid can be drawn here later.]
$im->writeImage ("Sample.png");
$im->destroy ();
# [Finished with image transformations, now continue with form elements.]
echo "<tr><th>$grfile</th></tr>$b";
echo "<tr>$b<td align=\"center\" valign=\"center\">$b";
echo "<img src=\"Sample.png\" style=\"cursor:crosshair\">$b</td></tr>$b";
echo "<tr><td><input type=\"hidden\" name=\"scale\" value=\"$scale\">$b";
echo "<input type=\"submit\" name=\"submit\" value=\"Preview\"></td><tr>$b";
Note that I have chosen the TIF format for the source file, because it seems that Imagick will not deal with PNG files correctly when it comes to the barrel distortion, which is at the heart of correcting photographic images for optical distortion.
With our viewable image in place, some grid lines could be superimposed on it for further orientation when straightening, debarreling, and
other improvements we wish to make. At the same time we could set the background colour of the table cell where the viewable image resides.
This means that we will be able to identify e.g. any parts of the picture that are missing due to the
transformations applied. In any case we will want to be able to choose from a small number of colours for both the
grid and the cell background, and to select a suitable spacing. This will be particularly useful in a somewhat surprising way later on.
First, choose some suitable spacings (anything that will divide into both the length and the width of the viewable image without leaving a
remainder), and name some colours, loading all of these values into two arrays:
# Towards the beginning of the script:
for ($i = 2; $i < 640 / 3; $i++) if (640 % $i == 0 and 480 % $i == 0) $gridarray[] = $i;
$gcarray = array ("black", "white", "gray", "yellow", "green", "red", "blue", "cyan", "pink");
if (!isset ($gcolour)) $gcolour = "black";
Then draw the grid itself on the image, after resizing the image sample.png and before writing it:
if (isset ($grid) and $grid != 0)
{
$draw = new ImagickDraw ();
$draw->setStrokeColor ($gcolour);
# [Since both $width and $height come from the intermediate image source.tif they have to be halved in the following]
$hdist = round ($width / $grid / 2);
$vdist = round ($height / $grid / 2);
for ($i = 1; $i < $grid; $i++)
{
$draw->line ($hdist * $i, 0, $hdist * $i, $height / 2);
$draw->line (0, $vdist * $i, $width / 2, $vdist * $i);
}
$im->drawImage ($draw);
$draw->destroy ();
}
Then set the background colour of the table cell with the image, and introduce two elements to the form for choosing the number of lines and their colour. And while we're at it, we'll need a second column to the right of the image for the elements of the form, so we will allow the image cell to span 20 lines so that we have enough space:
echo "<tr><th colspan=\"2\">$grfile</th></tr>$b";
echo "<tr>$b<td rowspan=\"20\" bgcolor=\"$gcolour\" align=\"center\" valign=\"center\">$b";
echo "<img src=\"Sample.png\" style=\"cursor:crosshair\">$b</td>$b";
# [...]
echo "<tr valign=\"top\"><td>Grid: <select name=\"grid\" size=\"1\">$b";
echo "<option";
if (!isset ($grid) or $grid == 0) echo " selected";
echo ">0</option>$b";
foreach ($gridarray as $gridvalue)
{
echo "<option";
if (isset ($grid) and $grid == $gridvalue) echo " selected";
echo ">$gridvalue</option>$b";
}
echo "</select>$b";
echo "<select name=\"gcolour\" size=\"1\">$b";
foreach ($gcarray as $gc)
{
echo "<option";
if ($gc == $gcolour) echo " selected";
echo " style=\"background-color:$gc\">$gc</option>$b";
}
echo "</select>$b";
echo "</td>$b</tr>$b";
Note that if the value of $grid is 0, no lines will be drawn, but the background cell colour will be set to the colour chosen.
Now we're all set to go.
With the preliminaries out of the way, I got to work at my list of transformations. First of all, I'd deal with rotating the image back to the level by introducing another element into the form. In order to preempt errors and for ease of reloading values, any values not set by the previous form would be set to default values:
if (!isset ($rotate)) $rotate = 0;
# [...]
echo "<tr valign=\"top\"><td>Rotate: <input type=\"text\" size=\"1\" name=\"rotate\" value=\"$rotate\">�</td></tr>$b";
Then it appeared an easy matter to implement this, as long as "rotate" managed to hold on to its customary meaning in Imagick:
if ($rotate != 0) $im->rotateImage ($gcolour, $rotate);
Voilà! that seemed to work OK, now onto the horizontal and vertical tilting. Here two further elements to the form:
if (!isset ($h_tilt)) $h_tilt = 0;
if (!isset ($v_tilt)) $v_tilt = 0;
#[...]
echo "<tr valign=\"top\"><td>Horizontal tilt: <input type=\"text\" name=\"h_tilt\" value=\"$h_tilt\" size=\"3\"></td></tr>$b";
echo "<tr valign=\"top\"><td>Vertical tilt: <input type=\"text\" name=\"v_tilt\" value=\"$v_tilt\" size=\"3\"></td></tr>$b";
Now I considered what I would do with them:
$args = array
(
0, 0, -$v_tilt, $h_tilt,
0, $height, $v_tilt, $height - $h_tilt,
$width, $height, $width - $v_tilt, $height + $h_tilt,
$width, 0, $width + $v_tilt, -$h_tilt
);
$im->distortImage (imagick::DISTORTION_PERSPECTIVE, $args, false);
Then I looked at the next item on my list, which would have been shearing, but I looked back at distortImage () and its arguments and thought, "What the *#$%�@!?"
Of course, why not do everything in one step? If the whole idea is to reduce perspective and other distortion by determining that four points formed a rectangle in real life and should be photographically represented as a rectangle, then there is no need for rotating, tilting or shearing. Just take the four points and give them values appropriate for a rectangle. No hours of fiddling about with parameters that does not and, yeah, cannot end up with the desired result. It was really that simple.

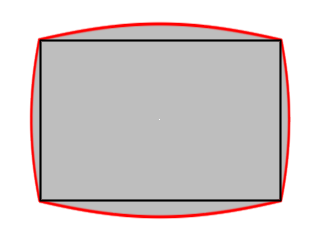
![]() The four-point perspective transformation requires the coordinates of four "old" points and the four new coordinates to which
these are to be moved. The remainder of the picture is projected accordingly. In order to minimise the losses to the image, the new image
is to be relocated so that the top line is horizontal at the average position of the two old top corners and the left line is vertical
at the average position of the two old left corners. In addition, the old top and bottom lengths are averaged to give the new width and the
old left and right side lengths are averaged to give the new height. The image on the left is a representation of such a transformed image
before the transformation, the image on the right with the old rectangle in red, the new in black.
The four-point perspective transformation requires the coordinates of four "old" points and the four new coordinates to which
these are to be moved. The remainder of the picture is projected accordingly. In order to minimise the losses to the image, the new image
is to be relocated so that the top line is horizontal at the average position of the two old top corners and the left line is vertical
at the average position of the two old left corners. In addition, the old top and bottom lengths are averaged to give the new width and the
old left and right side lengths are averaged to give the new height. The image on the left is a representation of such a transformed image
before the transformation, the image on the right with the old rectangle in red, the new in black.
The transformations will potentially affect two images: the original, should we decide to save a copy of the transformed image at the highest
possible resolution, and the somewhat reduced "thumbnail" that we are using for intermediate manipulations. The transformations
will therefore take place within a function, which can be called for either operation. The virtual pixel method also has to be dealt with.
First, some elements for the form:
$vparray = array ("black", "white", "gray", "edge", "mirror", "transparent");
if (!isset ($virtualpixel)) $virtualpixel = "black";
switch ($virtualpixel)
{
case "black": $vp = imagick::VIRTUALPIXELMETHOD_BLACK; break;
case "white": $vp = imagick::VIRTUALPIXELMETHOD_WHITE; break;
case "gray": $vp = imagick::VIRTUALPIXELMETHOD_GRAY; break;
case "edge": $vp = imagick::VIRTUALPIXELMETHOD_EDGE; break;
case "mirror": $vp = imagick::VIRTUALPIXELMETHOD_MIRROR; break;
case "transparent": $vp = imagick::VIRTUALPIXELMETHOD_TRANSPARENT; break;
}
$corners = array ("Upper Left", "Lower Left", "Lower Right", "Upper Right");
# [...]
echo "<tr valign=\"top\"><td><input type=\"checkbox\" name=\"fourpoint\"";
if (isset ($fourpoint) and $fourpoint == "on") echo " checked";
echo "> Four Point Transformation</td></tr>$b";
for ($j = 0; $j < 4; $j++)
{
echo "<tr valign=\"top\"><td>$corners[$j]</td></tr>$b";
echo "<tr valign=\"top\"><td>X: <input type=\"text\" name=\"cx[]\" size=\"3\" value=\"";
if (isset ($cx[$j])) echo $cx[$j];
echo "\"> Y: <input type=\"text\" name=\"cy[]\" size=\"3\" value=\"";
if (isset ($cy[$j])) echo $cy[$j];
echo "\"></td></tr>$b";
}
echo "<tr valign=\"top\"><td>Virtual Pixel: <select name=\"virtualpixel\" size=\"1\">$b";
foreach ($vparray as $vpvalue)
{
echo "<option";
if (isset ($virtualpixel) and $virtualpixel == $vpvalue) echo " selected";
echo ">$vpvalue</option>$b";
}
echo "</select>$b</td>$b</tr>$b";
Then we'll need to consider which specific parameters the function will need to perform the two intended operations and which parameters will have to be declared global:
function transform ($file, $long, $scale)
{
global $vp, $fourpoint $cy, $cx, $gcolour, $rotate, $width, $height, $aspect_ratio;
$im = new Imagick ($file);
$width = $im->getImageWidth ();
$height = $im->getImageHeight ();
if ($long == "Original") $long = max ($width, $height);
if ($aspect_ratio > 1) $sw = $long;
else $sw = $long * $aspect_ratio;
$sh = $sw / $aspect_ratio;
$im->setImageVirtualPixelMethod ($vp);
# [Further transformations will take place here]
if ($rotate != 0) $im->rotateImage ($gcolour, $rotate);
$im->resizeImage ($sw, $sh, Imagick::FILTER_SINC, 0.7);
return $im;
}
Now to the perspective transformation itself. With the arrays $cx and $cy holding the pixel values for the four corners in respect to the dimensions of the original image the new values can be calculated. If we are simply transforming the thumbnail image, then the local variable $scale has to be applied to scale down the coordinates accordingly; if the full image were being transformed, scale would be handed over to the function with the value set to 1. The calculations in detail:
if (isset ($fourpoint) and $fourpoint == "on")
{
$width_new = (sqrt (pow ($cx[3] - $cx[0], 2) + pow ($cy[3] - $cy[0], 2)) + sqrt (pow ($cx[2] - $cx[1], 2) + pow ($cy[2] - $cy[1], 2))) / 2;
$height_new = (sqrt (pow ($cx[1] - $cx[0], 2) + pow ($cy[1] - $cy[0], 2)) + sqrt (pow ($cx[2] - $cx[3], 2) + pow ($cy[2] - $cy[3], 2))) / 2;
$minx = round ((($cx[0] + $cx[1]) / 2) / $scale);
$maxx = $minx + round ($width_new / $scale);
$miny = round ((($cy[0] + $cy[3]) / 2) / $scale);
$maxy = $miny + round ($height_new / $scale);
for ($i = 0; $i < 4; $i++)
{
$scx[$i] = round ($cx[$i] / $scale);
$scy[$i] = round ($cy[$i] / $scale);
}
$points = array ($scx[0], $scy[0], $minx, $miny, $scx[1], $scy[1], $minx, $maxy, $scx[2], $scy[2], $maxx, $maxy, $scx[3], $scy[3], $maxx, $miny);
$im->distortImage (Imagick::DISTORTION_PERSPECTIVE, $points, false);
}
As it stands we have a thumbnail view of our image with our form to the right, with a checkbox for the perspective transformation,
8 fields for entering the X and Y coordinates of the four corners, a select box for grid spacing, another for grid/background colour,
one more for the virtual pixel method, a field for rotation and, perhaps, a submit button.
Now all we would have to do is to open the image in an editor, note down the coordinates of the four corners we want moved, return to
Correctrix ...
Yeah, right.
Wasn't there something computers were used for? Wouldn't it be easier just to click on the image already loaded? Yes, but that's not something
PHP can do, here's where we have to switch to JavaScript.
Only one complicating factor is that the various browsers refer to Javascript variables in different ways. Thus, the mouse position for one is
pageX and pageY and for another clientX and clientY. Not only are the names different but the behaviour on scrolling
down and across pages differs. But anyway.
Here's the plan: You've probably already noticed that the mouse cursor takes on the crosshair form when over the image. All the better to position
you with, my dear. Click first on the utmost, top, lefthand pixel as a reference point, then click on the four points Upper Left, Lower Left,
Lower Right and Upper Right in order and the values appear in the corresponding form fields. If because of the image composition the uppermost
lefthand pixel is obscure, then choose a suitable cell background colour first. That's why that was put in as a choice.
First, we'll need to tidy up our HTML a bit. The image needs to be told to call a JavaScript function when clicked on. The form needs to be arranged
so that the first element is a reset button, which will call its own JS reset function, followed by two hidden fields for the reference point
(orix and oriy) and clear text as to whether these reference points have been set or not. Next
element is the four point checkbox which can also automatically be set once values are entered into the fields. Then the fields for the
coordinate values have to come, so that the first field is #4 in the forms.elements array of JS. Finally, as a reminder, this is where the hidden
form elements "scale" and "aspect_ratio" come into play:
echo "<tr><th colspan=\"2\">$grfile</th></tr>$b";
echo "<tr>$b<td rowspan=\"20\" bgcolor=\"$gcolour\" align=\"center\" valign=\"center\">$b";
echo "<img src=\"Sample.png\" onclick=\"coords (event)\" style=\"cursor:crosshair\">$b</td>$b";
echo "<td valign=\"top\">$b<input type=\"button\" onclick=\"resetori ()\" value=\"Clear values\"></td>$b</tr>$b";
echo "<tr valign=\"top\">$b<td>$b<div id=\"origin\">";
if (isset ($orix) and isset ($oriy) and $orix and $oriy) echo "Origin: $orix, $oriy</div>"; else echo "Origin not set</div>$b";
echo "<input type=\"hidden\" name=\"orix\"";
if (isset ($orix) and $orix) echo " value=\"$orix\"";
echo ">$b<input type=\"hidden\" name=\"oriy\"";
if (isset ($oriy) and $oriy) echo " value=\"$oriy\"";
echo ">$b</td>$b</tr>$b";
echo "<tr valign=\"top\"><td><input type=\"checkbox\" name=\"fourpoint\"";
if (isset ($fourpoint) and $fourpoint == "on") echo " checked";
echo "> Four Point Transformation</td></tr>$b";
for ($j = 0; $j < 4; $j++)
{
echo "<tr valign=\"top\"><td>$corners[$j]</td></tr>$b";
echo "<tr valign=\"top\"><td>X: <input type=\"text\" name=\"cx[]\" size=\"3\" value=\"";
if (isset ($cx[$j])) echo $cx[$j];
echo "\"> Y: <input type=\"text\" name=\"cy[]\" size=\"3\" value=\"";
if (isset ($cy[$j])) echo $cy[$j];
echo "\"></td></tr>$b";
}
# [...]
echo "<input type=\"hidden\" name=\"scale\" value=\"$scale\">$b";
echo "<input type=\"hidden\" name=\"aspect_ratio\" value=\"$aspect_ratio\">$b";
Now to the JS itself. The function coords (event) needs to:
function coords (e)
{
if (!e) e = window.event;
theform = document.forms[0];
if (e.pageX || e.pageY)
{
posx = e.pageX;
posy = e.pageY;
}
else if (e.clientX || e.clientY)
{
posx = e.clientX;
posy = e.clientY;
}
if (theform.orix.value == "" && theform.oriy.value == "")
{
theform.orix.value = posx;
theform.oriy.value = posy;
document.getElementById ("origin").innerHTML = "Origin set: " + posx + ", " + posy;
} else
{
entry = false;
for (i = 0; i < 4; i++)
{
if (!entry && (theform.elements[(4 + i * 2)].value == "" || theform.elements[(4 + i * 2)].value == "0"))
{
theform.elements[(4 + i * 2)].value = 2 * Math.round ((parseInt (posx) - parseInt (theform.orix.value)) * theform.scale.value);
theform.elements[(5 + i * 2)].value = 2 * Math.round ((parseInt (posy) - parseInt (theform.oriy.value)) * theform.scale.value);
entry = true;
}
}
theform.fourpoint.checked = true;
}
}
In addition, JS can also be used to make sure the Four Point Transformation check box is ticked when there are entries in the corresponding fields. This needs to be declared within the form elements:
echo "<tr valign=\"top\"><td><input type=\"checkbox\" name=\"fourpoint\"";
if (isset ($fourpoint) and $fourpoint == "on") echo " checked";
echo "> Four Point Transformation</td></tr>$b";
for ($j = 0; $j < 4; $j++)
{
echo "<tr valign=\"top\"><td>$corners[$j]</td></tr>$b";
echo "<tr valign=\"top\"><td>X: <input type=\"text\" name=\"cx[]\" size=\"3\" value=\"";
if (isset ($cx[$j])) echo $cx[$j];
echo "\" onblur=\"tick()\"> Y: <input type=\"text\" name=\"cy[]\" size=\"3\" value=\"";
if (isset ($cy[$j])) echo $cy[$j];
echo "\"></td></tr>$b";
}
The JS function tick () is implemented as:
function tick ()
{
if (!document.forms[0].fourpoint.checked) document.forms[0].fourpoint.checked = true;
}

 Before we leave the perspective transformation it is worth pointing out that this transformation can also be used to change the position
and the size of the image by shifting and stretching. This might be necessary to help cover up some areas of the image left blank by
the perspective transformation itself. We will also see later that smaller, undefined corners can also be dealt with in another way.
Before we leave the perspective transformation it is worth pointing out that this transformation can also be used to change the position
and the size of the image by shifting and stretching. This might be necessary to help cover up some areas of the image left blank by
the perspective transformation itself. We will also see later that smaller, undefined corners can also be dealt with in another way.
In this way, our Slow Ducks (left after perspective distortion, right after shift/stretch) can be gradually transformed into a more pleasant image.
Shifting simply involves moving all four destination points by the same amount, although the shift along the X axis can be completely
independent of the shift along the Y axis.
Stretching of the rectangle of interest need only to apply to the width and height of the rectangle; but to ensure more or less central placement,
any stretch is accompanied by a shift of half that stretch along the corresponding axis in the opposite direction of the stretch. If a stretch
increases the size, then the upper left corner is moved closer to the origin, if the stretch decreases the size (squeeze), the upper left
corner moves towards the centre.
For these adjustments, additional form elements and a JS function are required. First, the PHP:
echo "<tr valign=\"top\"><td>Shift (- up/left, + down/right)</td></tr>$b";
echo "<tr valign=\"top\"><td>X: <input type=\"text\" name=\"sx\" size=\"3\" value=\"$sx\"> Y: <input type=\"text\" name=\"sy\" size=\"3\" value=\"$sy\"></td></tr>$b";
echo "<tr>$b<td>Stretch: <input type=\"checkbox\" name=\"stretchlock\"";
if ($stretchx == $stretchy) echo " checked";
echo ">Lock$b</td></tr>$b";
echo "<tr><td>X: <input type=\"text\" name=\"stretchx\" size=\"2\" value=\"$stretchx\" onblur=\"check_lock ()\">$b";
echo "Y: <input type=\"text\" name=\"stretchy\" size=\"2\" value=\"$stretchy\" onblur=\"check_lock ()\">$b";
echo "</td>$b</tr>$b";
The JS function check_lock () ensures that the Y value is made to equal the X value on leaving the X input box, if the Lock checkbox is ticked:
function check_lock ()
{
if (document.forms[0].stretchlock.checked) document.forms[0].stretchy.value = document.forms[0].stretchx.value;
}
Finally,
# [Setting not set variables]
if (!isset ($sx)) $sx = 0;
if (!isset ($sy)) $sy = 0;
if (!isset ($stretchx)) $stretchx = 0;
if (!isset ($stretchy)) $stretchy = 0;
# [Supplementing global variable list]
global $vp, $db, $fourpoint, $stretchlock, $stretchx, $stretchy, $sx, $sy, $cy, $cx, $gcolour, $rotate, $width, $height, $aspect_ratio;
# [Final perspective transform]
if (isset ($fourpoint) and $fourpoint == "on")
{
if (isset ($stretchlock) and $stretchlock == "on") $stretchy = $stretchx;
$width_new = (sqrt (pow ($cx[3] - $cx[0], 2) + pow ($cy[3] - $cy[0], 2)) + sqrt (pow ($cx[2] - $cx[1], 2) + pow ($cy[2] - $cy[1], 2))) / 2;
$stx = (100 + $stretchx) / 100;
$height_new = (sqrt (pow ($cx[1] - $cx[0], 2) + pow ($cy[1] - $cy[0], 2)) + sqrt (pow ($cx[2] - $cx[3], 2) + pow ($cy[2] - $cy[3], 2))) / 2;
$sty = (100 + $stretchy) / 100;
$minx = round (((($cx[0] + $cx[1]) / 2) + $sx - $stretchx * $width_new / 200) / $scale);
$maxx = $minx + round ($stx * $width_new / $scale);
$miny = round (((($cy[0] + $cy[3]) / 2) + $sy - $stretchy * $height_new / 200) / $scale);
$maxy = $miny + round ($sty * $height_new / $scale);
for ($i = 0; $i < 4; $i++)
{
$scx[$i] = round ($cx[$i] / $scale);
$scy[$i] = round ($cy[$i] / $scale);
}
$points = array ($scx[0], $scy[0], $minx, $miny, $scx[1], $scy[1], $minx, $maxy, $scx[2], $scy[2], $maxx, $maxy, $scx[3], $scy[3], $maxx, $miny);
$im->distortImage (Imagick::DISTORTION_PERSPECTIVE, $points, false);
}
The next transformation on the list is debarreling/depincushioning the image. This is achieved with distortImage () calling the DISTORTION_BARREL method which requires an array of 8 arguments. In order to keep the corners/midlines constant and thus prevent losing more of the image than necessary, the 4th and 8th constants are calculated by means of the second constant and the aspect ratio. For the math, see here. The PHP is:
if ($db != 0)
{
$aspect_ratio = ($width / $height);
if ($aspect_ratio < 1) $ar = pow (1 / $aspect_ratio, 2); else $ar = pow ($aspect_ratio, 2);
if ($db > 0) $ddx = $ddy = 1 - ($ar + 1) * $db;
else
{
$ddx = 1 - $db * $ar;
$ddy = 1 - $db;
}
if ($width > $height) $args = array (0, $db, 0, $ddx, 0, $db, 0, $ddy);
else $args = array (0, $db, 0, $ddy, 0, $db, 0, $ddx);
$im->distortImage (Imagick::DISTORTION_BARREL, $args, false);
}
Logically, the barrel distortion has to be the first to be executed as it affects the image as a whole and must have the original image as its starting point. The correct order of distortions is thus:
| Corner | Before transform | After transform | ||
|---|---|---|---|---|
| Upper Left | 696 | 568 | 696 | 588 |
| Lower Left | 712 | 3250 | 708 | 3240 |
| Lower Right | 1922 | 2764 | 1912 | 2754 |
| Upper Right | 2084 | 692 | 2090 | 712 |
Of course, if you have the time to test your camera and lens, then the optimal sequence can be followed and optimal images are just a matter of two steps. According to Niemann this can be done be taking a series of pictures with the following attributes:
| Auditorium Entrance | University Offices | ||||||
|---|---|---|---|---|---|---|---|
| Before | After | F | B | Before | After | F | B |
 |  | 6.0 | -0.016 |  |  | 6.0 | -0.016 |
 |  | 6.7 | -0.014 |  |  | 6.7 | -0.011 |
 |  | 10.3 | 0.000 |  |  | 8.2 | -0.005 |
 |  | 16.1 | 0.002 | 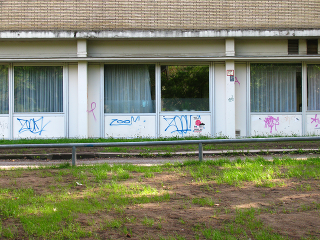 | 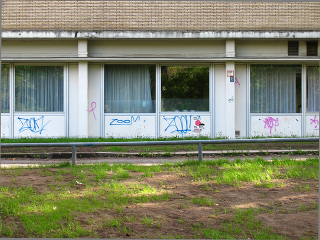 | 12.8 | 0.001 |
 |  | 22.4 | 0.004 | 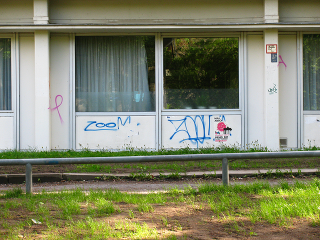 |  | 20.1 | 0.002 |
 |  | 34.9 | 0.004 |  |  | 31.5 | 0.002 |
 |  | 55.9 | 0.006 | 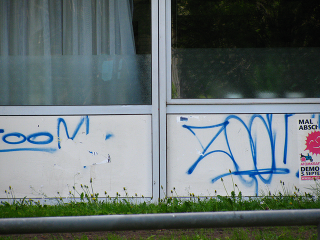 |  | 51.1 | 0.004 |
 |  | 60.0 | 0.005 | 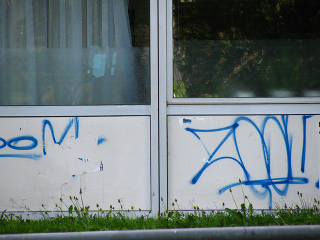 |  | 60.0 | 0.005 |
Put in all the wrong values? Can't move the mouse to the very last pixel in the upper left corner? Time to reset the values and start from
scratch with a reset button!
This is again a task for JS. The implementation:
function resetori ()
{
document.getElementById ("origin").innerHTML = "Origin not set";
theform = document.forms[0];
theform.orix.value = "";
theform.oriy.value = "";
for (i = 0; i < 4; i++)
{
theform.elements[(4 + i * 2)].value = "";
theform.elements[(5 + i * 2)].value = "";
}
theform.rotate.value = 0;
theform.db.value = 0;
theform.sx.value = 0;
theform.sy.value = 0;
theform.fourpoint.checked = false;
}
 A variable for virtual pixels has been set but until now, not much has be done with it. Imagick uses virtual pixels to fill out
parts of the image that would otherwise be left blank following a distortion. In the case of the barrel distortion, virtual pixels are theoretically
not necessary, because the image is transformed in such a way as to compensate for the variable stretching and squeezing. The perspective
distortion, however, will almost always result in undefined areas. Even when stretched a little more in the X dimension than in the y, Slow
Ducks are still missing two corners on the left (virtual pixel set to black or transparent, left).
A variable for virtual pixels has been set but until now, not much has be done with it. Imagick uses virtual pixels to fill out
parts of the image that would otherwise be left blank following a distortion. In the case of the barrel distortion, virtual pixels are theoretically
not necessary, because the image is transformed in such a way as to compensate for the variable stretching and squeezing. The perspective
distortion, however, will almost always result in undefined areas. Even when stretched a little more in the X dimension than in the y, Slow
Ducks are still missing two corners on the left (virtual pixel set to black or transparent, left).
One way of dealing with these undefined corners would be to expand the image until the corners disappeared, but that would start eating up
large portions of the landscape. Another way involves virtual pixels.
 We have already seen how in the function transform (), the global variable $vp (derived
from the form element virtualpixel) is used in setImageVirtualPixelMethod () to set the corresponding virtual
pixel.
We have already seen how in the function transform (), the global variable $vp (derived
from the form element virtualpixel) is used in setImageVirtualPixelMethod () to set the corresponding virtual
pixel.
How might this come in handy? Setting the virtual pixel to black (or transparent), white, gray simply colours in the undefined areas with
those colours (transparent does not seem to work as intended, but is left in there just in case it one day might). Note that not all
colours can be used for the virtual pixel. But edge and mirror seem to offer some useful possibilities. Edge simply
extends the edge pixel to the border and results in multicoloured lines spreading towards the corners. When used in very small areas this
might achieve a desirable result. Mirror can sometimes be used more extensively, where the mirroring of the nearest parts of the image
itself is not conspicuous. In the case of Slow Ducks we have now reached our goal, since the tree on the top left corner and the grass on the
bottom left are actually barely noticeable mirror images.
The time has come to save our manipulated image by performing the manipulations on a full-size copy of the original, downscaling it and saving it to disk. The first thing needed is a selection box in the form with various standard sizes for downscaling:
echo "<tr valign=\"top\"><td>Save to size: <select name=\"savetosize\" size=\"1\">$b";
for ($i = 0; $i < 5; $i++)
{
$x = pow (2, $i + 3) * 10;
$y = $x * 3 / 4;
echo "<option value=\"$x\"";
if ($x == $savetosize) echo " selected";
echo ">$x" . "x$y</option>$b";
}
echo "<option>Original</option>$b</select>$b</td>$b</tr>$b";
#[In the submit section of the form]
echo "<input type=\"submit\" name=\"submit\" value=\"Save from Original\">$b";
This gives us the possibility of choosing a long dimension of 80, 160, 320, 640 or 1280 pixels, or the original size. A special submit
button for this action is required in the submit section of the form (see next section).
Then there's the matter of implementation. Saving from the original should take place as part of the loop in which the image is manipulated,
because we would immediately like to see what the saved image looks like without having to leave the program (just in case some parameter were
inadvertently changed). However, it takes place after the image has been manipulated and calls exactly the same function,
transform (), with its own set of parameters:
if ($submit == "Save from Original")
{
$im = transform ($grfile, $savetosize, 1);
$file_name = "Crtrix Samples/" . substr ($grfile, 0, strrpos ($grfile, ".")) . "_LT.png";
$im->writeImage ($file_name);
$im->destroy ();
}
Time has come to move to the next file, and, if we include the part of the form for loading a new file at the foot of our thumbnail, there should be no difficulty in replacing the old file with the new as long as the following is kept in mind:
if (isset ($grfile_new) and $grfile_new)
{
$grfile = $grfile_new;
unset ($scale, $gcolour, $virtualpixel, $savetosize, $cx, $cy, $sx, $sy, $rotate, $db, $grid, $fourpoint, $stretchx, $stretchy, $orix, $oriy, $aspect_ratio);
}
Let's summarise the main parts of the script:
Thomas Niemann claims that he wrote 30,000 lines of code to come up with PTLens. The whole of Correctrix including the JS weighs in as just over 270. Most of these have to do with the form. Not even 50 are required for the image manipulations themselves. Make up your own mind.
And for those who want to go further...
The method for positioning the rectangle of interest described above attempts a minimal perspective distortion to retain as much of the
image as possible.
Task: Centre the image instead, regardless of the losses to the edges of the image; or make the rectangle of interest as large as
possible either retaining the aspect ratio or simply having the rectangle of interest take up the whole image.
Hint: All of these possible actions would be desirable as choices (radiobuttons) in the form, and the stretch X and Y values would have to
entered into the appropriate fields.
When both the barrel and perspective distortions have to be applied iteratively, because Dersch's B is unknown, or indeed unknowable, several
rounds of iteration might be necessary.
Tasks: